Table of Contents
You’ve got the vision, the tools, and the determination. Now all that’s left is turning that blank canvas into a beautifully finished wall.
But where do you start? How do you ensure that your drywall framing project is a success? Don’t worry, we’ve got you covered.
In this guide, we’ll provide you with 13 essential tips that will take your drywall framing skills to the next level. From accurate measurements to expert painting techniques, we’ll walk you through each step of the process, leaving your walls looking flawless.
So, are you ready to transform your space? Let’s get started.
Key Takeaways
- Proper measuring and marking techniques are essential for accurate and precise drywall installation.
- Choosing the right tools and equipment, such as a tape measure with a lock feature and a stud finder, can make the process easier and more efficient.
- Understanding stud spacing regulations and utilizing blocking and bridging techniques ensure structural support and stability.
- Cutting and installing drywall panels requires careful measurement, precise cuts, and secure fastening to the framing.
Measuring and Marking for Accuracy
To ensure accuracy in your drywall framing, start by measuring and marking with precision. Proper leveling techniques and achieving straight lines are essential for a successful project. When measuring, use a tape measure with clear and easy-to-read markings. Make sure it’s securely locked in place before taking any measurements. Take your time and double-check your measurements to avoid any errors.
Once you have your measurements, it’s time to mark the walls. Use a straightedge, like a level or a chalk line, to create straight lines. This will guide you in placing your drywall accurately. Ensure that the straightedge is level before marking the wall. If you’re using a level, place it horizontally or vertically against the wall, and adjust until the bubble is centered between the lines. This will guarantee that your lines are straight and level.
When marking the walls, use a pencil or chalk to create light, visible lines. These marks will act as a guide when installing the drywall. Start by marking the top and bottom lines, ensuring they’re level and parallel to each other. Then, mark the studs or framing members, following the layout plan or measuring intervals. These marks will help you know where to attach the drywall.
Choosing the Right Tools
When it comes to drywall framing, having the right tools is essential for success. Selecting the right equipment can make all the difference in achieving accurate and efficient results.
From tape measures and levels to screw guns and framing hammers, these must-have tools will help you get the job done with precision and ease.
Essential Tools for Framing
Choosing the right tools is essential for successful drywall framing. As someone who wants to belong to the community of skilled framers, it’s important to have the right equipment that will make your job easier and more efficient.
When it comes to measuring techniques, a good tape measure with a lock feature is a must-have. This will ensure accurate measurements every time.
Additionally, a quality stud finder will help you locate obstacles behind the drywall, such as pipes or electrical wires, ensuring that you can handle any potential issues before they become a problem.
Other essential tools include a framing square for precise angles, a utility knife for cutting the drywall, and a cordless drill for fastening the boards securely.
With the right tools in hand, you’ll be well-equipped to tackle any drywall framing job with confidence and skill.
Selecting the Right Equipment
As you embark on the task of selecting the right equipment for drywall framing, it’s crucial to consider the tools that will streamline your work and ensure successful results.
Here are some essential tools to help you get started with drywall framing:
- Cordless Drill: A reliable cordless drill will make it easier to drive screws and secure the drywall to the framing.
- T-Square: A T-square is an invaluable tool for making accurate measurements and ensuring precise cuts.
- Drywall Taping Knife: This tool is essential for spreading joint compound and creating smooth, seamless seams.
- Screw Gun: A screw gun is specifically designed for fastening drywall screws quickly and efficiently.
Must-Have Tools for Efficiency
To maximize efficiency in drywall framing, it is essential to select the right tools for the job. By using the appropriate tools, you can save time and effort while achieving professional results. Here are some must-have tools that will help you streamline your drywall framing process:
| Tool | Purpose |
|---|---|
| Tape Measure | Accurate measurements are crucial for precise cuts and fitting. |
| Framing Square | This tool ensures that your corners are perfectly square, resulting in a sturdy frame. |
| Screw Gun | A powerful screw gun will make fastening drywall to the frame a breeze. |
| Drywall Lift | This tool will save your back by lifting and holding drywall sheets in place while you secure them. |
With these tools at your disposal, you can tackle any drywall framing project with ease. Remember to utilize proper measuring techniques and be prepared to handle any obstacles that may arise. Happy framing!
Understanding Stud Spacing
Properly spacing your studs is essential for a successful drywall framing project. Not only does it ensure structural stability, but it also allows for a smooth and seamless installation of the drywall. To help you understand stud spacing better, here are some techniques and common mistakes to avoid:
- Measure twice, cut once: Take accurate measurements before marking the locations for your studs. This will ensure that they’re evenly spaced and aligned, preventing any gaps or unevenness in your drywall.
- Follow building codes: Familiarize yourself with the local building codes and regulations regarding stud spacing. These codes may vary depending on factors such as load-bearing walls, fire safety, and insulation requirements. Adhering to these guidelines will help you avoid costly mistakes and ensure compliance with the law.
- Use blocking and bridging: Incorporating blocking and bridging techniques can enhance the structural strength of your wall. These methods involve adding additional wood or metal pieces between studs to provide extra support and prevent sagging or bowing over time.
- Avoid over or under-spacing: One common mistake is spacing the studs too far apart or too close together. Over-spacing can weaken the structure and lead to sagging, while under-spacing may result in inadequate support for the drywall, causing it to crack or buckle.
Cutting Drywall Panels
When it comes to cutting drywall panels, there are a few key points you need to keep in mind.
First, you’ll want to ensure you’re using proper measuring techniques to get accurate dimensions.
Secondly, choosing the right tools, such as a utility knife or drywall saw, will make the cutting process much smoother.
Lastly, making precise cuts is crucial to ensure the panels fit together tightly and create a seamless finish.
Proper Measuring Techniques
Using precise measurements is essential for cutting drywall panels accurately and efficiently. To ensure accurate measurements, you need to use the right measuring tools.
Here are some tips to help you master proper measuring techniques:
- Always use a tape measure with clear, easy-to-read markings.
- When measuring, hold the tape measure firmly against the surface to prevent any movement.
- Double-check your measurements to avoid any costly mistakes.
- Use a straight edge or level to ensure your measurements are straight and even.
Choosing the Right Tools
To ensure precise and efficient cutting of drywall panels, it’s crucial to select the appropriate tools for the job. When it comes to cutting drywall, having the right tools can make all the difference.
One of the most commonly used tools for cutting drywall is a utility knife. Make sure to use a sharp blade and apply enough pressure to cut through the panel smoothly.
Another tool that can be handy is a drywall saw, which is specifically designed for cutting through drywall. It has a serrated edge that allows for quick and easy cutting.
Additionally, a keyhole saw can be used for making small, intricate cuts. Remember to always measure and mark your cuts accurately before using these cutting techniques, ensuring that you achieve the desired results.
Making Precise Cuts
Achieve precise cuts on drywall panels by selecting the appropriate tools and applying the right techniques. To ensure accuracy and avoid common cutting mistakes, follow these precision cutting techniques:
- Measure twice, cut once: Take the time to measure your drywall panels correctly before making any cuts. Double-check your measurements to avoid costly mistakes.
- Use a sharp utility knife: A sharp blade allows for clean and precise cuts. Replace the blade regularly to maintain its sharpness.
- Score before cutting: Score the drywall surface along the cut line before applying pressure to prevent the gypsum core from cracking.
- Cut from the face side: When making cuts, position the drywall with the face side up to achieve cleaner edges.
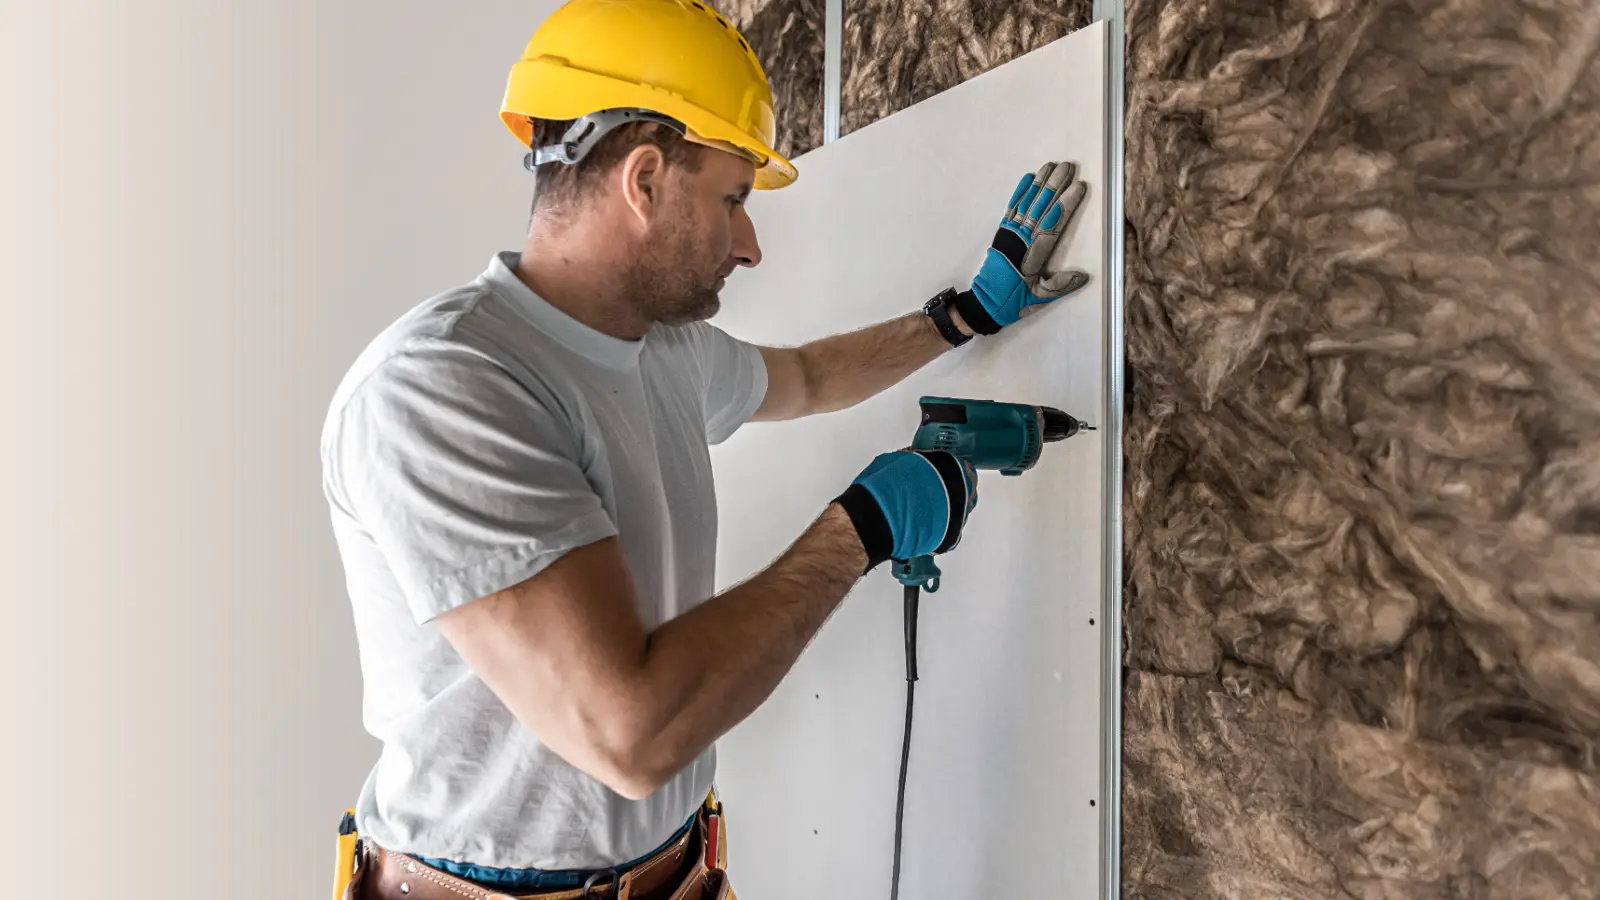
Installing the First Panel
Start by aligning the edge of the first panel with the corner of the framing, ensuring a flush and level surface. This is a crucial step in installing the first panel of drywall, as it sets the foundation for the rest of the installation.
To ensure accuracy, use measuring techniques to determine the correct dimensions for the panel. You can measure the height and width of the wall, and then transfer those measurements onto the drywall. Be sure to account for any outlets or openings that may require cutting techniques.
Once you have measured and marked the dimensions on the drywall, it’s time to cut the panel to size. Using cutting techniques such as a utility knife or a drywall saw, carefully score the drywall along the marked lines. Apply gentle pressure to create a shallow groove. Then, using a straightedge as a guide, firmly snap the drywall along the scored lines. This will result in a clean and precise cut.
With the first panel cut to size, it’s time to position it against the framing. Ensure that the panel is aligned with the corner and that the edges are flush and level. Use a level to double-check the alignment and make any necessary adjustments.
Once you’re satisfied with the positioning, secure the panel to the framing with drywall screws or nails, making sure to space them evenly.
Securing Drywall to the Studs
Secure the drywall to the studs by driving drywall screws or nails through the panel and into the framing at regular intervals. Here are some essential tips for securing the drywall to the studs:
- Measure twice, cut once: Before securing the drywall, make sure to measure accurately. Use measuring techniques like a tape measure or a T-square to ensure the right dimensions. This will help you avoid wastage and ensure a precise fit.
- Start from the center: Begin securing the drywall at the center of the panel and work your way outwards. This method allows for better stability and minimizes the risk of the panel shifting or sagging over time.
- Mind the obstacles: Obstacle handling is crucial when securing drywall. If you encounter electrical outlets, light switches, or other obstacles, carefully measure and mark their locations on the drywall. Use a drywall saw or utility knife to cut around them, maintaining the integrity of the panel.
- Use the right fasteners: Choose the appropriate fasteners for securing the drywall. Drywall screws are recommended over nails for better holding power and reduced chances of popping. Make sure to drive the screws or nails snugly into the studs, but be careful not to overdrive them and break the drywall’s surface.
Dealing With Obstacles and Cutouts
Now let’s talk about how to handle obstacles and cutouts when framing drywall.
When it comes to obstacles, such as pipes or electrical boxes, it’s crucial to use the right techniques for navigating around them.
Additionally, installing cutouts for outlets, switches, or vents requires careful planning and precision to ensure a clean and professional finish.
In the following sections, we’ll explore obstacle handling techniques and provide tips for installing cutouts effectively.
Obstacle Handling Techniques
To successfully handle obstacles and cutouts during drywall framing, it’s important to approach each challenge with careful planning and precision. Here are some effective obstacle handling techniques and problem-solving strategies to help you navigate through your drywall framing project:
- Measure Twice, Cut Once: Taking accurate measurements before cutting can save you time and materials, ensuring a precise fit for your drywall around obstacles or cutouts.
- Create Templates: Making templates for irregular or complex shapes can help you avoid mistakes and ensure a perfect fit.
- Use Appropriate Tools: Having the right tools, such as a drywall saw or a rotary tool, can make it easier to navigate around obstacles and cutouts.
- Seek Professional Advice: If you’re unsure about how to handle a specific obstacle or cutout, don’t hesitate to consult with professionals or experienced individuals in the field. Their guidance can help you overcome any challenges you may encounter.
Cutout Installation Tips
When dealing with obstacles and cutouts during cutout installation, careful planning and precision are key to ensure successful drywall framing. Proper cutout placement is essential to accommodate electrical outlets, switches, and other fixtures.
Before starting, make sure to measure and mark the exact location of each cutout on the drywall. Take into account any obstructions, such as pipes or studs, that may affect the placement.
Once you have determined the cutout placement, select the right tools for the job. A drywall saw or rotary tool with a cutting bit can be used to make precise and clean cutouts. Remember to wear safety goggles and gloves to protect yourself during the installation process.
With careful planning and the right tools, you can overcome any obstacles and achieve a successful cutout installation.
Taping and Mudding Joints
Ensure a smooth and seamless finish by properly taping and mudding the joints of your drywall. The tape and mud techniques you use are crucial in achieving seamless joints that will make your walls or ceilings look flawless. Here are some tips to help you master the art of taping and mudding:
- Prep the joints: Before applying tape and mud, make sure the joints are clean and free from any debris or dust. Use a joint knife to scrape away any loose particles and create a smooth surface.
- Apply the tape: Start by applying a thin layer of joint compound along the joint using a trowel or a putty knife. Then, press the tape firmly into the compound, making sure it’s centered over the joint. Smooth out any wrinkles or bubbles with your knife, ensuring the tape is securely attached.
- Coat the joints: Once the tape is in place, apply a layer of joint compound over it. Use a wider knife or trowel to spread the compound evenly, extending it beyond the edges of the tape. Feather the edges to create a seamless transition between the joint and the surrounding drywall.
- Sand and repeat: After the first coat of compound has dried, lightly sand the surface to remove any imperfections. Apply subsequent coats of mud, gradually widening the area to blend with the surrounding drywall. Remember to sand between each coat for a smooth and professional finish.
Sanding for a Smooth Finish
Now that you have applied multiple coats of joint compound and achieved seamless joints, the next step towards achieving a flawless finish is sanding the surface for a smooth result. Sanding is a crucial step in the drywall finishing process, as it helps to blend the edges of the joint compound, removes any imperfections, and creates a seamless surface. In this section, we will discuss some effective sanding techniques that will help you achieve smooth surfaces.
To ensure that you achieve the best results, it is important to use the right sandpaper grit for each stage of the sanding process. Here is a handy table that outlines the different sandpaper grits and their recommended uses:
| Sandpaper Grit | Recommended Use |
|---|---|
| 80-100 | Initial sanding to remove excess joint compound and smooth out rough areas. |
| 120-150 | Intermediate sanding to further refine the surface and blend the edges of the joint compound. |
| 180-220 | Final sanding to achieve a smooth and flawless finish. |
When sanding, it is important to use smooth and even strokes, applying gentle pressure. Start with a coarser grit sandpaper and gradually move to finer grits for a polished finish. Remember to sand in a circular motion to avoid creating visible lines or grooves on the surface.
After sanding, wipe the surface with a damp cloth or sponge to remove any dust particles. This will help you achieve a clean and smooth surface before applying primer and paint.
Applying Texture, if Desired
If you want to add texture to your drywall, there are various techniques you can use. Applying texture techniques can help you achieve a textured finish that adds depth and visual interest to your walls. Here are some popular methods you can try:
- Knockdown texture: This technique involves spraying joint compound onto the walls and then using a trowel to flatten and create random patterns. It creates a textured finish that resembles the look of stucco.
- Skip trowel texture: With this method, joint compound is applied to the walls using a trowel or drywall knife. The compound is then lightly skimmed across the surface, creating a subtle texture with a handcrafted look.
- Orange peel texture: This technique involves using a spray gun to apply joint compound in a fine mist. The compound dries with a texture that resembles the surface of an orange peel. It’s a popular choice for achieving a subtle, uniform texture.
- Popcorn texture: Popcorn texture, also known as acoustic or cottage cheese texture, is a classic option for adding texture to ceilings. It involves spraying a mixture of joint compound and water onto the ceiling, creating a bumpy, popcorn-like texture.
When applying texture to your drywall, it’s important to prepare the surface properly and practice the technique on a scrap piece of drywall first. This will help you achieve the desired texture and avoid any mistakes on your actual walls. Remember to follow the manufacturer’s instructions for the specific texture product you choose and take your time to ensure a professional-looking finish.
Priming the Drywall
To properly prepare your textured drywall for painting, the next step is to apply a coat of primer. Priming the drywall is an essential step that ensures the paint adheres properly and provides a smooth and durable finish. It also helps to seal the surface and prevent moisture absorption, which can lead to mold or mildew growth.
When it comes to priming techniques, there are a few options to choose from. The most common method is using a roller or brush to apply the primer evenly across the surface. Make sure to work in small sections and apply the primer in thin coats to avoid drips or uneven coverage. Another technique is using a paint sprayer, which can provide a more even and efficient application, especially for large areas. However, it requires proper equipment and can be more challenging to control.
Painting Techniques for a Professional Look
Achieving a professional look when painting your drywall requires using proper techniques and tools. To ensure your paint job is flawless, follow these tips:
- Prepare the drywall: Before painting, make sure the drywall is smooth and free of imperfections. Sand any rough spots and fill any holes or cracks with spackle. This will create a smooth surface for the paint to adhere to.
- Choose the right paint: Selecting the appropriate paint is crucial for achieving a professional finish. Opt for a high-quality paint that’s specifically designed for drywall. Consider the sheen as well, as different finishes can affect the appearance of your walls. Matte or eggshell finishes are ideal for hiding imperfections, while satin or semi-gloss finishes offer more durability and are easier to clean.
- Use high-quality brushes and rollers: Invest in good quality brushes and rollers to ensure smooth and even coverage. Synthetic brushes are best for latex paints, while natural bristle brushes work well with oil-based paints. Use a roller with a nap appropriate for your wall texture, ensuring that it applies the paint evenly.
- Apply paint in thin, even coats: Instead of loading your brush or roller with too much paint, apply thin, even coats. This will prevent drips and streaks, resulting in a professional-looking finish. Allow each coat to dry completely before applying the next.
Finishing Touches and Clean Up
Now that you have achieved a professional look with your painting techniques, it is important to focus on the finishing touches and clean up to complete the project. These final steps will not only enhance the overall appearance of your drywall framing but also ensure its longevity. By following the appropriate cleaning techniques and implementing post-installation maintenance, you can create a space that you truly feel a sense of belonging to.
To help you with the finishing touches and clean up, here are some essential tasks you should consider:
| Finishing Touches | Clean Up |
|---|---|
| Apply a final coat of joint compound to smooth out any imperfections. | Remove any dust or debris from the walls and floors. |
| Sand the drywall to create a smooth surface for painting. | Vacuum the area to eliminate any remaining dust particles. |
| Install corner beads to protect the edges of the drywall. | Wipe down the walls and baseboards with a damp cloth. |
| Apply a primer before painting to ensure proper adhesion. | Dispose of any leftover materials and packaging properly. |
By paying attention to these details, you can achieve a polished and professional look for your drywall framing project. Additionally, regular post-installation maintenance is crucial for preserving the quality of your walls. This includes inspecting for any cracks or damage, repairing them promptly, and periodically cleaning the walls to remove dirt and stains.
Taking the time to complete these finishing touches and clean up tasks will not only enhance the aesthetic appeal of your space but also create a sense of pride and belonging. So, roll up your sleeves and put the final touches on your drywall framing project, knowing that you have done everything possible to make it a success.
Wrap-Up
As you finish up your drywall framing project, remember that each step is like a brushstroke on a canvas.
Your accurate measurements and precise cuts are the foundation, while the right tools are your paintbrushes.
The stud spacing and panel installation create the structure, while texture and paint add depth and personality.
Finally, the finishing touches and clean up are like the final touches on a masterpiece.
With these tips, your drywall framing will be a work of art.